
Preparing for Calving Season
Agriculture and Natural Resources
MT202405AG
New August 2024

By Rebekah Clark, MSU Undergraduate Student; Hannah DelCurto-Wyffels, MSU Associate Teaching Professor; Megan Van Emon, MSU Extension Beef Cattle Specialist
Calving season is one of the most important times for cow-calf producers in Montana. Calf loss during the calving season can impact the overall profitability and success of an operation. Being prepared for calving is one step toward successful cow and calf health after birth. Collecting all calving supplies in a single, known location can improve response time should a cow need help. Additionally, adequate and clean facilities and equipment can reduce the incidence of injury and disease.
Facilities, Equipment, and Materials
FACILITIES
A proper calving set-up is important to a successful calving season. While not all facilities are the same, there are a few common practices that can help producers with calving.
It is important to walk through all calving facilities to ensure they are functional before calving begins. A barn or pens used for assisting problem births or for shelter during inclement weather should include fresh and clean bedding. An area should be available within the barn or pens where producers can properly restrain cows that need assistance. Using a manual, self-catch head gate is an easy option for producers, especially if they are working alone. Having a side gate next to the head catch can help restrain the cow during times of assistance. Further, having a side gate can be helpful when a cow is unsure of her calf, as the cow can be restrained and still allow a newborn calf to nurse. Cleaning pens after each cow-calf pair has been moved and keeping the barn dry and clean is critical for newborn calf health.
EQUIPMENT
Having proper equipment on hand during calving can be the difference between a live or dead calf (Image 1). All equipment must be cleaned and sanitized before and after every use, as contamination or disease transmission can occur if equipment is not properly cleaned between uses. Improper sanitation can lead to infection or sickness in either the calf or the cow. At the time of calving, the following equipment should be readily available:
-
Stainless steel obstetric (OB) chains (30- or 60-inch) and OB handle
- Calf puller
- Disposable shoulder-length plastic gloves
- Commercial OB lubricant
- Common disinfectant - chlorhexidine (Nolvasan®) or iodine (Betadine®)
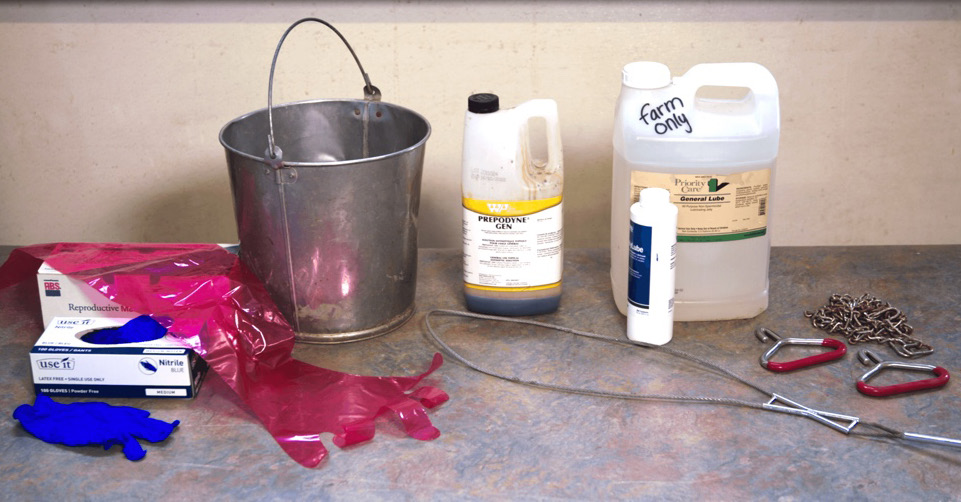
Image 1. Common calving supplies (Photo: Beef Cattle Research Council).
MATERIALS
Other materials producers should keep on hand to assist during calving season:
- Colostrum and milk replacer
- Colostrum supplement
- Electrolytes
- Thermometer
-
Suction bulb for suctioning fluid from calf nostrils with breathing difficulty
- Bottle and nipple for feeding calf
- Stomach tube or esophageal feeder
Having these items available helps ensure a successful calving season, as well as the health and well-being of the livestock. Additionally, keeping equipment and materials in a single, central location can aid in readiness and response time during a difficult birth. Post or provide contact information for the local veterinarian with calving equipment and supplies.
Stages of Calving
The calving process is triggered by the fetus through the initiation of a hormone cascade. This hormone cascade results in several biological events. When space in the uterus becomes limited for the calf, the calf produces fetal cortisol, a stress hormone. The release of cortisol from the calf stimulates prostaglandin production in the cow’s placenta, which in turn encourages the cervix to soften and stretch. Cortisol will also increase the metabolism of maternal progesterone into estradiol, which promotes contraction of the uterus. These hormonal changes lead to increased lubrication of the reproductive tract, the stretching of pelvic ligaments, dilation, uterine contraction, and the subsequent delivery of the calf.
During the last few weeks of pregnancy, the cow’s vulva begins to swell, and the udder begins to fill. During the last four to six days of pregnancy, the pelvic ligaments begin to relax, and the area between the tailhead and pin bones becomes sunken and loose. The actual calving process can be divided into three stages: preparatory (stage one), fetal expulsion (stage two), and placenta expulsion (stage three).
STAGE ONE
Stage one of calving, the preparatory stage, is the dilation of the cow’s cervix. The cervix is normally tightly closed. As progesterone levels decline in the cow, contractions begin and consequently, start to relax the cervix. In this first stage, cervical dilation begins between four and 24 hours before the actual birth of the calf. Pressure increases within the uterus, causing — in normal deliveries — the fetus to position its head and feet toward the posterior of the cow. As contractions become more frequent and the cervix continues to dilate, the calf begins to enter the birth canal.
During this stage, cows typically begin to show visible signs of discomfort. Cows in stage one may become restless, often pacing or laying down and getting back up again. They tend to switch their tails or hold their tail out. Sometimes, they may even kick at their stomach or arch their back in an attempt to relieve pressure. Some cows separate themselves from the herd or don’t come to the feedline. Further, there will be an increase in mucous discharge. Identifying signs that a cow is in stage one is critical for successful calving management and determining if intervention or assistance might be necessary.
STAGE TWO
The second stage of calving, the fetal expulsion stage, begins with the appearance of placental membranes (water bag) and concludes with the actual birth of the fetus (Image 2). The expulsion of the water bag is followed by the release of relaxin, a hormone that softens the connective tissue in the cervix. Estradiol stimulates mucus production by the cervix and the vagina. The mucus and placental fluids lubricate the birth canal.
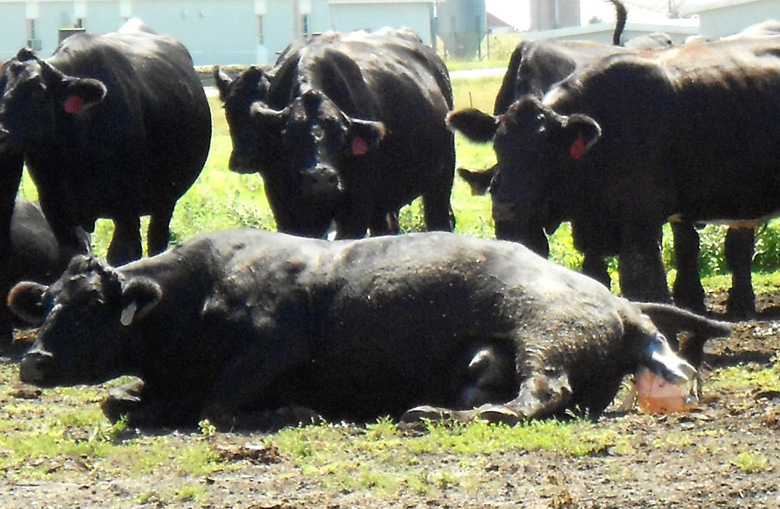
Image 2. A cow in stage two of labor with the water bag and feet visible (Photo: Grant Dewell, Iowa State University).
As the calf enters the birth canal, pressure is put on the cervix, which encourages the cow to push. The feet and head of the calf progress through the birth canal due to the combined contractions of both the uterus and the abdomen. At the same time, pressure is put on the placenta until it eventually ruptures, releasing placental fluids. After this rupture, contractions continue to strengthen, and the cow progresses through delivery.
STAGE THREE
The third and final stage of calving, the placental expulsion stage, occurs six to 12 hours after stage two. Immediately after the calf is delivered, the placenta detaches from the uterus. As the placenta detaches, structures on the placenta known as cotyledons separate from the structures on the uterus called caruncles. The interlocking of cotyledons and caruncles (placentome) provides a passageway for the fetus to receive nutrients and expel waste. Further contractions expel the placenta from the cow, usually within 12 hours after delivery (Image 3). It is recommended to allow the cow to expel the placental membranes rather than assist.

Image 3. A cow in stage three of labor with the placental membranes visible (Photo: Grant Dewell, Iowa State University).
Calf Presentation
NORMAL PRESENTATION
Being able to recognize a normal calving birth position, or presentation, is just as important as being able to recognize when the presentation of the calf is abnormal. The normal presentation of a calf is anterior or forward-facing. In the normal presentation, the head and front feet of the calf should be pointed toward the posterior end of the cow. The hooves should be pointed down and the head should be resting on top of the front limbs, with the eyes level with the calf’s knees (Figure 1). When a calf is normally presented, the majority of cows give birth without assistance.
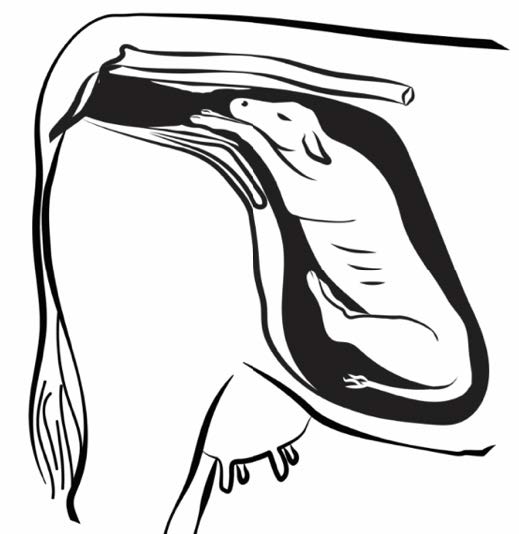
Figure 1. The normal presentation of a calf is forward-facing, with the head and front feet pointing toward the posterior end of the cow (Diagram: Beef Cattle Research Council).
MALPRESENTATIONS
Many types of malpresentation can occur during labor, including backward, breech, and transverse positions. All abnormal presentations cause labor difficulty for the cow, with some being more difficult than others. The most common types of malpresentation are breech and backward calves (Figures 2 and 3).
In a backward, or posterior, presentation (Figure 2), the hindfeet of the calf are pointed toward the posterior end of the cow. The hooves will point upwards, rather than downwards, as in a normal presentation. Looking at the direction the hooves point is the easiest way to determine if the calf is backward.
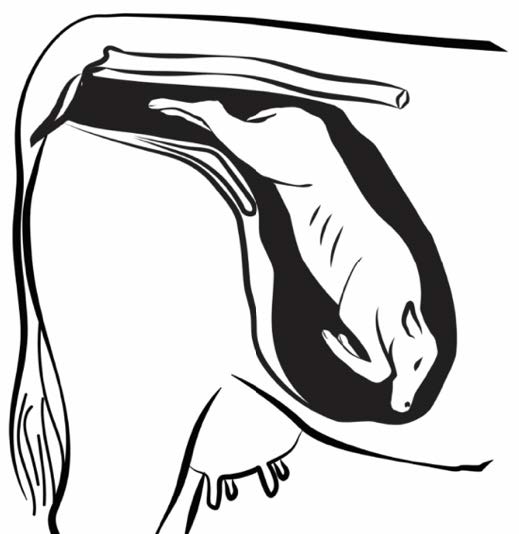
Figure 2. The backward, or posterior, presentation of a calf has the hind feet pointing toward the posterior end of the cow and the hooves will point upwards (Diagram: Beef Cattle Research Council).
A breech position (Figure 3) is similar to a backward position, with the calf presenting posteriorly. However, the calf will present butt first, with no front or hind limbs entering the birth canal.
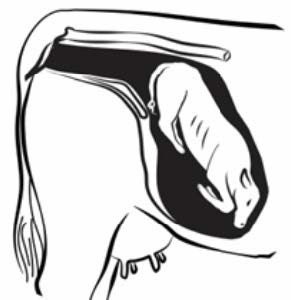
Figure 3. A breech position of a calf is butt first, with no front or hind limbs in the birth canal (Diagram: Beef Cattle Research Council).
Another common malpresentation is a calf which presents anteriorly, but the head of the calf is pushed back, with only the forefeet being presented (Figure 4).
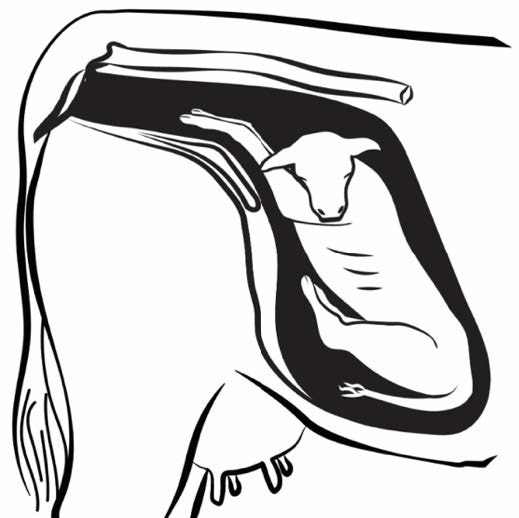
Figure 4. An example of a malpresentation where the head of the calf is back (Diagram: Beef Cattle Research Council).
Intervention
Intervention and assistance depend on progress made and how the calf is presented. It is crucial for producers to examine and assess the cow to determine calf position and any need for assistance.
ASSESSMENT
Regular observations are necessary to determine the progress of labor. Normal delivery should occur within two hours after the water bag appears. For first-time heifers, this can be up to three hours. However, if delivery has not occurred within this time frame, the cow should be brought in and examined vaginally. Similarly, if no progress has been made 30 minutes after the appearance of the water bag, the cow should be examined to determine if there is a problem.
The cow should be examined vaginally to first determine the calf position. The producer needs to put on gloves and use plenty of OB lubricant. If the calf has only begun to enter the birth canal, the producer can feel the hooves to determine if they are facing up or down. Producers should also determine if there is enough space in the birth canal for the calf. This can be done by putting one hand flat against the calf and moving around it. If the calf is too large for the birth canal, meaning one hand is unable to move around the calf, a local veterinarian should be contacted immediately.
One of the most common calving problems with heifers is that the cervix has not dilated sufficiently during labor. Using the technique above may lead a producer to think the calf doesn’t have enough space. However, producers can massage the cervical membranes for five to 10 minutes to help the cervix fully dilate and ready for the birth. If the cervix does not fully dilate after a cervical massage, a local veterinarian should be contacted immediately.
ASSISTANCE
How producers assist depends on the calf presentation as well as the relative size of both the cow and calf. All deliveries should be conducted with proper preparation and in a clean, safe environment.
Should a calf need to be pulled, proper placement of OB chains reduces the chance of a broken leg or injured foot (Figure 5). To properly place the chain, loop the chain above the fetlock joint and then make a half hitch below the fetlock joint. The end of the chain should go over the top of the toes so that when pressure is applied, the calf’s hooves are pulled away from the vaginal wall.
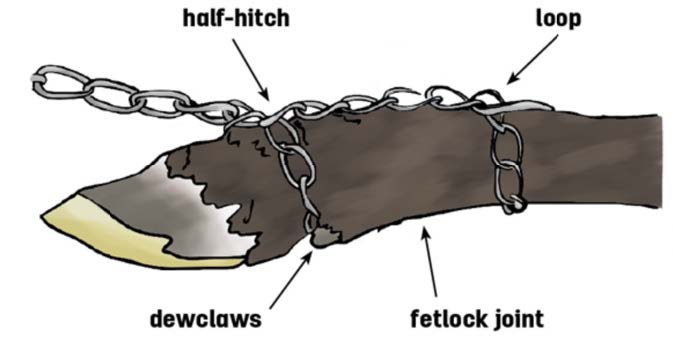
Figure 5. Place a loop above and a half-hitch below the fetlock joint (Diagram: Alabama Extension).
The most common problem with normal presentations is the delivery of large calves. When pulling the calf, alternate by pulling one limb at a time. The elbow and shoulder of that limb will enter the pelvis first (Figure 6). Then, apply traction on both limbs and guide the head until it emerges. Once the head is out, pull straight backward until the chest of the calf has emerged. Then apply traction downward until the rest of the calf emerges.
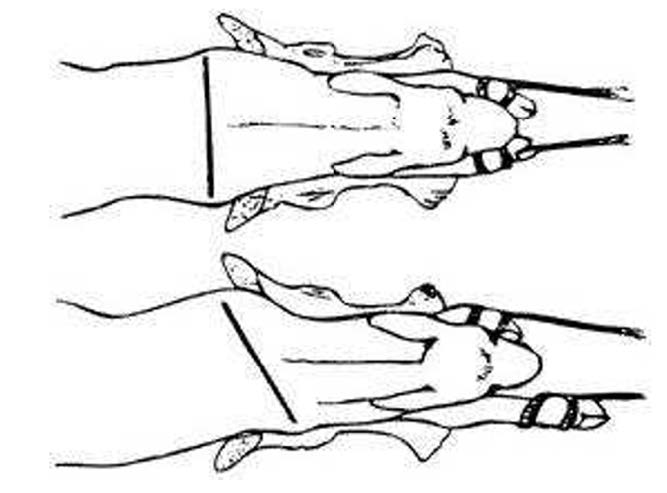
Figure 6. How to pull a calf one limb at a time so the shoulders can clear the pelvis (Image adapted from University of Nebraska NebGuide G81-539, Assisting the Beef Cow at Calving Time, by Gene H. Deutscher and Donald B. Hudson).
In a backward position, the biggest concern is getting the calf out in a timely manner. As the calf begins to pass through the pelvis, the umbilical cord can be pinched or severed, thus cutting off oxygen to the calf. Similar to assisting with a normal presentation, traction should be applied one limb at a time. It may be necessary to push one leg back into the uterus. After the first limb has been drawn back, traction should then be applied to both limbs. If this does not work, cross one limb over the other and pull on the lower limb. This will rotate the calf slightly to one side and align the calf with the widest part of the pelvis to aid in delivery. It is important to also make sure the tail is down and between the legs, rather than sticking upward, as it can damage the top of the vagina.
When assisting cows during labor, no matter the presentation of the calf, there are considerations for the benefit of the cow and the producer:
-
Patience. The reproductive tract of the cow needs time to dilate enough to allow the calf safely through. This requires time for reproductive hormones to work.
-
Use as much OB lube as necessary. Not using enough OB lube and trying to deliver a dry calf can harm the reproductive tract of the cow, as well as make the process much more difficult.
-
Only pull when the cow is pushing. Pulling “against” the cow can severely damage the reproductive tract and make delivery more difficult. This can also lead to the cow and producer getting tired quickly.
-
Do not use excessive force. Avoid jerking and irregular pulls, which can harm both the calf and the cow, instead use steady traction.
As a precaution, any cow that needs assistance should be provided medication as prescribed by the veterinarian.
Postnatal Care
After the calf is birthed and on the ground, the producer needs to ensure the calf gets a good start. Most cows begin to clean and lick their calf almost immediately after birth. However, if the cow does not immediately begin to clean the calf, it’s vital to first make sure the calf can breathe. The mucus needs to be cleared, as it can clog the nostrils of the calf. Breathing can be stimulated by taking a piece of straw, or grass, and tickling the inside of the calf’s nose. This causes the calf to sneeze, and therefore, help clear mucus from the airways.
Along with ensuring the calf is breathing and able to stand, it’s essential that the calf nurses within two to four hours after birth. Colostrum, or the first milk produced by the cow after birth, is high in nutrients and antibodies and needs to be consumed as soon after birth as the calf can nurse or through intervention to ensure the nutrients and antibodies are absorbed. A newborn calf lacks disease protection because antibodies do not pass the placental membrane to the fetus. The antibodies in colostrum provide calves with their initial protection.
It is also important to monitor the cow after labor to ensure the placenta passes. The placenta is normally expelled within three to eight hours after birth. A cow that retains her placenta can face complications, including infection. If the cow has not passed her placenta within 12 hours after birth, the producer should not attempt to remove the placenta manually, as it can cause damage to the uterine structures, and should instead contact a veterinarian.
Further, producers should monitor the cow to ensure a prolapse does not occur. A prolapse refers to an internal organ making its way outside the body. When referring to cattle, there are two types of prolapses related to calving and knowing the difference between them is important when deciding the urgency of veterinary care. A uterine prolapse occurs when the entire uterus is expelled through the vagina after birth. This prolapse requires immediate veterinary assistance, as a uterine prolapse can lead to organ damage and the rupture of the uterine artery. A vaginal prolapse is the expulsion of the vagina and sometimes the cervix. A vaginal prolapse can retract, and some resolve themselves after calving. However, if the tissue is constantly protruding, and or showing any signs of damage, a veterinarian should be consulted.
If a cow has a cesarean-section (C-section), the cow should be watched for dehydration and mastitis. Incision complications and a retained placenta can also occur following a C-section. If either of these occur, contact a local veterinarian for treatment.
References
Cooke, Reinaldo, Villarroel, Aurora, and Estill, Charles. 2018. Calving school handbook. Oregon State University Extension Service.
Selk, Glenn. 2018. Calving Time Management for Beef Cows and Heifers. Oklahoma State University Extension.
To download more free online MontGuides or order other publications, visit our online catalog at store.msuextension.org, contact your county or reservation MSU Extension office, or e-mail orderpubs@montana.edu.
Copyright © 2024 MSU Extension We encourage the use of this document for nonprofit educational purposes. This document may be reprinted for nonprofit educational purposes if no endorsement of a commercial product, service or company is stated or implied, and if appropriate credit is given to the author and MSU Extension. To use these documents in electronic formats, permission must be sought from the Extension Communications Director, 135 Culbertson Hall, Montana State University, Bozeman, MT 59717; E-mail: publications@montana.edu
The U.S. Department of Agriculture (USDA), Montana State University and Montana State University Extension prohibit discrimination in all of their programs and activities on the basis of race, color, national origin, gender, religion, age, disability, political beliefs, sexual orientation, and marital and family status. Issued in furtherance of cooperative extension work in agriculture and home economics, acts of May 8 and June 30, 1914, in cooperation with the U.S. Department of Agriculture, Cody Stone, Director of Extension, Montana State University, Bozeman, MT 59717.